Cutting mode on the Wainlux K6 engraver is much faster than the other engraving modes. This is because rather than scanning back and forth like a traditional printer, it follows the contours of the image. The test piece below is a good example that shows even complex contours - with lines inside lines - are possible in Cutting mode.
Cutting mode is not just for cutting. With the right settings, it can be used to trace an image in wood or other materials. The obvious limitation is that you can't fill areas. With a little forward planning, it is possible to combine faster engraving of lines with slower engraving of more detailed areas. The equivalent image in Black or Greyscale mode takes around 45 minutes.
 Using the logo from my daughter's business, I ran some tests for the cutting options. In all cases the engraving size is 70mm in diameter. Any settings that are not mentioned are left at their defaults. You will not see much difference in the photos, but please read the descriptions for more explanation. The fact that you cannot see a noticeable difference is an indication in itself that when engraving wood or other rougher surfaces, speed can be favoured over precision. Here the material is a semi-hardwood, an off-cut from a laminate floor.
The tests were carried out on Wainlux Windows software version 1.1.2 and firmware version 6 (November 2020)
- Cutting Depth: 25%
- Accuracy: High
- Time: 05:47
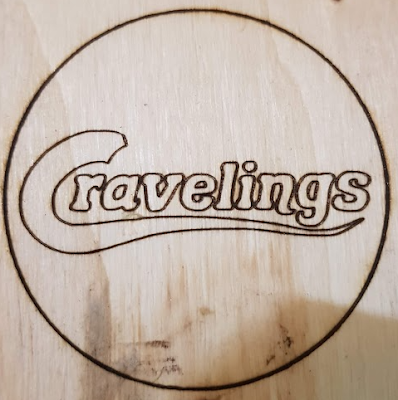
The depth is easily sensed with a fingernail and the detail is very dark and crisp.
- Cutting Depth: 15%
- Accuracy: High
- Time: 05:27

It is noticeable that the engraving is shallower to touch, but there is no doubt it is an engraving. The lines are sharper and only slightly lighter.
- Cutting Depth: 15%
- Accuracy: Moderate
- Time: 03:53
- Actual Diameter: 55mm

Although over 90 seconds faster on the Moderate setting, the image is significantly smaller, and not as previewed on the Wainlux-provided software screen. A 70mm engraving is realised at 55mm in diameter. The quality is equivalent to the previous test.
The next impromptu test was done as a result of the smaller image on moderate settings. I wanted to compare it to a 55mm engraving using the High setting.
- Cutting Depth: 15%
- Accuracy: High
- Time: 03:48

The lines are a little sharper, the colouring is the same and surprisingly, it was a few seconds faster to complete.
I just got mine and have started experimenting. I noticed that if you disconnect and reconnect from the unit, the image will resize to what will be cut. Then you can adjust to what you want it to do. This is on a mac with 1.1.3
ReplyDeleteWhat format does the artwork need to be to be compatible with "cutting"? I took a test image to grey scale and then flattened it to a single layer and saved as a jpg.......I loaded it to the machine and picked the lower of the 4 options (the panda icons to the right of the artwork, but the laser still handled it like a carving rather than a cutting?
ReplyDelete